Wednesday, July 31, 2013

Lemon Berry Tiramisu

Don't you just love being pleasantly surprised when you order a dish at a nice restaurant and the menu description sounds good, but when the server places it in front of you, the presentation is eye-catching and then the first bite (and every bite thereafter) totally blows your expectations off the charts?!  Yeah, me too! :)

Apparently that's what happened when my brother ordered a lemon berry napoleon dessert at the Wolfgang Puck Bar & Grill in Las Vegas...it made such an impression on him that he described it to Mom and me as "the best dessert I've ever eaten!"  Now that's a pretty bold statement, especially for Jon!  Haha :)  I asked him to describe it to me so I could try to re-create my own version of this delectable dessert.  I found several recipes that sounded pretty close to what he described, each with slight variations, so I decided that I would attempt to make it for him sometime soon after that...and I had good intentions of doing just that.  Except that was nearly 5 years ago now...ooooops, sorry Jon! :P  I even put a reminder on my calendar on several occasions when I knew I was going to be home for a weekend, but something always came up...I didn't have the ingredients I needed, there were already too many desserts in the house, I filled up my schedule and didn't end up having time to make it, we weren't both home at the same time, etc.

Oh, and did I mention that phyllo dough was a necessary ingredient?  Yeahhh...I even bought frozen phyllo sheets, and they stayed in my freezer for like, a year.  I don't know why the idea of using phyllo dough is so daunting to me...I'm sure it's really not bad at all.  In fact, it's probably quite simple and I just need to buck up and do it for the first time to show myself that it's not a big deal.  But alas, I was still looking for an easy way to avoid it.  So, I was thrilled to find this Lemon Tiramisu Trifle recipe from FoodNetwork.com, which includes the same lemon cream and summer berries as the napoleon recipe, but replaces the phyllo pastry with ladyfingers! Yesss!!! Now I was eager to give it a shot and see whether this variation would meet Jon's approval, so I decided to make it for the 4th of July. Ladies and gentlemen...I present "Lemon Berry Tiramisu!"

Lemon Berry Tiramisu


Ingredients:
  • 1/4 cup fresh lemon juice
  • 1/4 cup granulated sugar
  • 12 oz. (1 plus 1/2 pkg) neufchâtel cream cheese, softened
  • 1 - 8 oz. jar lemon curd
  • 2 cups heavy cream
  • 2 packages soft ladyfingers (usually found in the bakery section of certain grocery stores)
  • 3 cups mixed berries (strawberries, raspberries, blackberries, & blueberries)
  •  Powdered sugar (if desired)
In a small bowl or glass measuring cup, mix the lemon juice, sugar, and 1/4 cup water until the sugar is dissolved.  Set aside.

Blend together the cream cheese, lemon curd, and heavy cream with a hand mixer until smooth and somewhat fluffy.  Set aside.

To assemble the tiramisu, place half of the ladyfingers in the bottom of an 8x8 square baking dish, tearing several as needed to completely cover the bottom of the dish.  Drizzle ladyfingers with half of the lemon syrup. 


Spread half of the lemon cream over the ladyfingers...


Then, arrange 1 cup of mixed berries over the cream.  


Repeat the layers (ladyfingers - lemon syrup - lemon cream).

Cover with plastic wrap or tight-fitting lid and chill overnight.  Before serving, top with remaining berries and dust with powdered sugar, if desired.


So, the verdict?  Jon's response: "It's not quite Wolfgang Puck's, but it's still pretty d*mn delicious!"

Thanks Jon - I will take that as a compliment.  Mission (somewhat) accomplished. :)

Although I still intend to overcome my fear of phyllo dough and try to make the real thing...hopefully it won't take me another 5 years to make that happen ;)

Sunday, July 14, 2013

Summer Squash & Couscous Casserole

Nothing says summer quite like fresh garden-grown veggies and the delish dishes that you can make with them!  That's my opinion, at least.  When I was home for the July 4th weekend, Mom sent me back to RVA with a bag full of zucchini and yellow squash from her garden.  I always really appreciate when she does that, because I enjoy finding new recipes and pulling out tried and true ones to put the veggies to good use!  However, I always feel a bit guilty for taking them, considering all of the time and effort that Mom puts into garden (i.e. tilling, weeding, planting, watering, picking veggies, etc.).  Most of you know that I'm not exactly someone who likes getting my hands dirty or working outside (unless I'm running haha), so despite watching her work in her garden year after year, I've never actually helped out in that regard (sorry Mom!).  Yet, she never hesitates to send me home with some of my fave produce!  I know I don't say it enough, but thanks Mom! :)

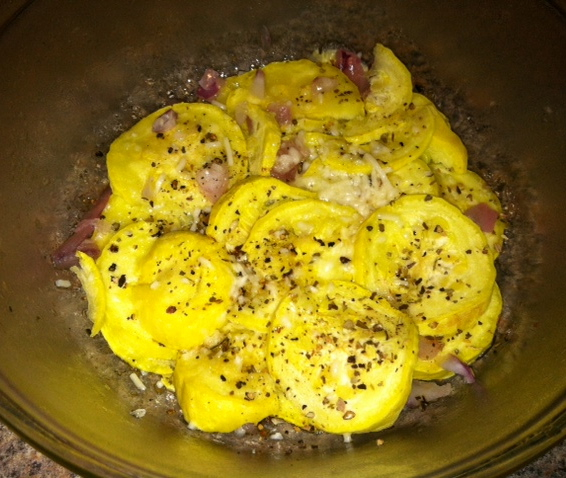
After finishing a short run one night earlier this week, I was hungry and didn't feel like going to any elaborate measures to make dinner, so I just sautéed some yellow squash with red onions, garlic, and lots of black pepper and oregano. Topped it off with some grated pecorino romano cheese...totally simple and delicious!

(Sorry, iPhone pic)

I looked up some new yellow squash recipes during the week and came across this Cooking Light recipe for Baked Couscous with Summer Squash & Herbs.  Per usual, I used that recipe as my base, but tweaked some things to make it my own. :)

Summer Squash & Couscous Casserole

Ingredients:

  • 1 (14 oz.) can vegetable broth
  • 3/4 cup uncooked whole wheat couscous
  • 2 cups sliced yellow summer squash
  • 1/4 cup minced red onions (or yellow or green onions...I just used red b/c that's what I already had on hand)
  • 1 garlic clove, minced
  • 1/4 cup crumbled Feta cheese
  • 1/4 cup grated parmesan cheese
  • 1/4 cup grated pecorino romano cheese
  • 1/4 cup egg substitute
  • 1/8 tsp. freshly ground black pepper
  • 1/8 tsp. white pepper
  • 1 tsp. oregano
  • 1/8 tsp. red pepper flakes
  • 1/4 tsp. parsley
  • Chopped fresh basil

Preheat oven to 400 F.  Bring 1 cup veggie broth to a boil in a small saucepan; gradually stir in uncooked couscous.  Remove from heat - cover and let stand 5 minutes.  Fluff couscous with a fork once all liquid has been absorbed.

Meanwhile, heat a large nonstick skillet over medium-high heat.  Coat pan with cooking spray.  Add squash, onions, garlic, basil, oregano, and black pepper; saute 3 minutes or until squash is tender.


Combine couscous, squash, and half of cheeses in a large bowl.


Then, stir in remaining veggie broth, egg substitute, white pepper, parsley, and red pepper flakes.


Spoon mixture into a greased 8x8 baking dish.  Top with remaining cheeses.  Bake at 400 F for 35 minutes, or until golden brown.


Tuesday, July 2, 2013

Jalapeño Popper Dip

Last weekend, a group of us celebrated our friend Caroline's 29th birthday with a mid-afternoon get-together at her house.  That morning, as I was trying to decide what to make for the party (and therefore, perusing my Pinterest boards, per usual, haha), I almost settled on making the Spicy Maryland Crab Dip that I made for the Super Bowl and on several other occasions since.  But then I changed my mind and decided to try something new...thus I whipped up a Jalapeño Popper Dip, which I adapted from this recipe.  Turns out that was a good decision :)

Jalapeño Popper Dip


Ingredients:
  • 1 - 8 oz. package Neufchatel (Light) cream cheese
  • 1 cup fat-free or light sour cream
  • 2 tbsp. light mayo
  • 1 - 4 oz. can diced jalapeños, well drained or 4-6 fresh jalapeños, roasted & diced 
  • 2 cups shredded (reduced-fat) cheddar cheese - I used 1 cup sharp + 1 cup mild
  • 1/2 cup + 1/4 cup grated parmesan cheese
  • 1/2 cup Italian seasoned bread crumbs
  • 1 tbsp. dried parsley
  • 3 tbsp. butter or margarine, melted

In a medium bowl, mix cream cheese, sour cream, and mayo until well-blended.

Add diced jalapeños, cheddar cheese, and 1/2 cup parmesan cheese. Mix together.

Transfer mixture into a greased 8x8 baking dish, spreading evenly.


Blend bread crumbs, 1/4 cup grated parmesan, and dried parsley together. Sprinkle topping mixture evenly over the cheese mixture. Pour melted butter evenly over topping (I was lazy and just dropped pats of softened margarine on top to let them melt in the oven, which worked out fine, but I would probably recommend actually melting the butter first and pouring it on top).


Bake at 350°F for 20-25 minutes, or until topping is golden brown and the dip is hot throughout.

Serve hot with whole grain tortilla chips, pita chips, crusty bread, or crackers. Enjoy! :)


This just might become my new favorite dip to bring to parties!  It's super simple to throw together, tastes like jalapeño poppers without all of the work, and tastes deliciously spicy with just the right amount of kick!

Thursday, June 13, 2013

Cake Batter Blondies

On Wednesday afternoon, I realized that I would actually have some free time after work to bake something for my Thursday night LIFE Group.  Thus, I consulted my "Delectable Desserts" Pinterest board to help me decide what to make, and after perusing for several minutes, I finally settled on this recipe for "Cake Batter Blondies."  I mean, cake batter, white chocolate chips, and other yummy ingredients combined into a moist, chewy, and richly delicious dessert bar....what's not to love?  Plus, they are super easy to make and don't require much time at all!  I managed to bake them when I got home from work and still had plenty of time leftover to go for a 9 mile run while it was still light outside. :)

Alas, my LIFE Group friends ended up missing out on these delish blondies due to the severe thunderstorms that passed through the area and thus cancelled our group meeting last night.  However, this was much to my coworkers' and neighbor's delight as they were the ultimate beneficiaries of my baked goods.

Cake Batter Blondies Recipe

Ingredients:
  • 1 box white or Funfetti® cake mix
  • 1/4 cup vegetable oil
  • 1/4 cup skim milk
  • 1 egg or 1/4 cup egg substitute
  • 1 tsp. vanilla
  • 1/4 cup heavy whipping cream
  • 1/2 cup white chocolate chips
  • 1/4 cup rainbow sprinkles (omit if using Funfetti® cake mix)
Instructions:

Grease 8x8 baking dish/pan with Pam for Baking (or any other cooking spray with flour). Pre-heat oven to 350°F.

Mix together cake mix, oil, milk, egg substitute, vanilla, and heavy whipping cream until well combined.


Add in white chocolate chips (and rainbow sprinkles, if using).

Pour batter into prepared pan and cook for 20-30 minutes, or until golden brown on top, but still slightly undercooked in the center.  *Do NOT overcook.*  Wait at least 20 minutes before cutting to give the bars time to set properly.


Notice the gooey cake batter center...this is why it is important not to over bake these.  The unbaked middle section makes these bars extra delicious! :)

These cake batter bars were a huge hit with my coworkers, which was evidenced by the fact that several of them hovered over my baking dish, scarfing down multiple bars in a matter of minutes! ;)

Be sure to make these for a gathering of some sort, or else be ready to pawn them off on your family/friends...you do not want to tempt yourself by keeping a whole pan of these sitting in your kitchen. :P


Monday, June 3, 2013

Extreme Peanut Butter & Chocolate Fudge Cake

I've been on an unplanned "poke cake" roll lately, ever since I made a tres leches cake for some friends' Cinco de Mayo party.  It received rave reviews and several people asked for the recipe.  Then, those same friends invited my b/f and I over for dinner several weeks later...under the one condition that I bring dessert...more specifically, another tres leches cake!  Haha.  I was totally flattered and excited to make the cake again!

Then, per usual, I signed up to bring dessert to a leadership planning dinner/meeting last week and stumbled upon a recipe from Something Swanky for a Reese's Cups & Pieces Better Than Anything Poke Cake (that's a mouthful, literally and figuratively haha ;)  It looked absolutely delicious, so I figured it was worth giving a try....the verdict from my friends affirmed that thought. :)

So, here's my version...renamed accordingly:

Extreme Peanut Butter Chocolate Fudge Cake

  • 1 box chocolate fudge or Devil's Food cake mix (plus the oil, eggs, and water called for on the package instructions)
  • 1 can fat-free sweetened condensed milk
  • 1 - 12.8 oz. jar hot fudge sauce
  • 1/3 cup peanut butter
  • 1 - 8 oz. container Cool Whip Free (optional)
  • 3 tbsp. peanut butter (optional)
  • 1/2 cup Reese's Pieces
  • 6 Reese's cups, broken into small pieces

Directions:

Grease bottom-only of a 13x9 cake pan with Pam for Baking non-stick spray.  Combine cake mix, oil, eggs, and water in a medium bowl.  Bake according to package instructions.  Once cake has been removed from the oven, allow to cool for at least 5 minutes.

Use a fork to poke holes evenly throughout the cake.

Slowly pour the can of sweetened condensed milk evenly over the cake.


While waiting for the cake to absorb the milk, spoon the hot fudge into a medium bowl.  Add the 1/3 cup peanut butter.  Microwave for 30 seconds, then for another 15-20 seconds, or until of a spreadable consistency.  Stir until the fudgy-peanut butter mixture is smooth, then spread over the cake.


If desired, mix the 3 tbsp peanut butter with Cool Whip and spread over the fudgy-peanut butter layer (I left this step out due to time restraints...either way is fine, but I'm sure it's a great added touch.

Chill overnight until ready to serve.  Top with Reese's Pieces and chopped Reese's cups before serving.


Enjoy! :)

Monday, May 13, 2013

Hashbrown Casserole Makeover...Vegetarian Friendly Style ;)

If you grew up in the South, chances are you're probably a fan of the cheesy potluck favorite known as Hashbrown Casserole.  My mom makes the best hashbrown casserole, and it was usually one of the side dishes that I requested for her to make as part of my family birthday dinner.  I remember asking for her recipe after I began delving into the cooking world during college, and it has become the basis for my go-to casserole recipe (next to baked mac & cheese, of course ;) when I need to make something that requires minimal prep time or that can be prepared ahead of time and refrigerated for several hours until I'm ready to pop it in the oven.  I made this casserole for Mother's Day lunch yesterday, and while it was baking, I realized that I had never actually posted the recipe on my blog, despite making it dozens of times over the past several years.  Time to fix that...

Although hashbrown casserole is a far stretch from being "healthy" by any means, I have tweaked the recipe to cut out as many calories and grams of fat as possible, while still maintaining the creamy texture and cheesy deliciousness of the original version.  My version also replaces the cream of chicken soup with cream of celery in order to make it a vegetarian friendly dish. :)

"Healthified" & Vegetarian Friendly Hashbrown Casserole


Ingredients:

  • 1 (32 oz.) package frozen southern-style diced hashbrown potatoes, thawed
  • 1 (10.75 oz.) can reduced-fat cream of celery soup (I've also used cream of mushroom before, but prefer cream of celery)
  • 10 oz. fat-free sour cream (from a 16 oz. container)
  • 1 1/2 cups reduced-fat sharp cheddar cheese, shredded
  • 1/2 cup reduced-fat mild cheddar cheese, shredded
  • 1/2 cup chopped yellow onion
  • 1/4 tsp. garlic powder
  • 1/4 tsp. fresh ground black pepper
  • 2 tbsp. unsalted butter, melted
  • 2 tbsp. grated parmesan cheese
  • 1 tbsp. paprika

1. Preheat oven to 350°F.  Grease 9x13 casserole dish with cooking spray and set aside.

2. In a large bowl, combine soup, sour cream, mild & sharp cheddar cheese, onion, garlic powder, black pepper, hash brown potatoes, and melted butter (add butter last, pouring over top of the mixture).  Mix well and transfer potato mixture to the prepared casserole dish.  

3. Sprinkle parmesan cheese and paprika evenly over casserole.

4. Bake uncovered for 30-35 minutes, or until bubbly.


With summer potluck season upon us, consider making this for your next family or church picnic!  If my family's reaction is any indication, it is sure to be a big hit! :)


Thursday, April 25, 2013

Qrazy for Quesadillas!

With Cinco de Mayo right around the corner, what better time to experiment with some Mexican recipes?  Several months ago, knowing how much I enjoy cooking and how excited I get about kitchen gadgets, a dear family friend gave me a quesadilla maker (thanks so much, Nealda! :)  Last night, after getting home from a short run (I donated blood on Tuesday and apparently it takes me a while to bounce back from that, since a 5.6 mile run was literally all I could muster...despite running a solid 12.3 miles on Sunday, but I digress), I decided that it was time to break out the quesadilla maker and concoct something tasty! The result...Black Bean Quesadilla for one!

Black Bean Quesadilla

Ingredients:
  • 2 (10-inch) flour tortillas
  • 1 can black beans (I prefer reduced-sodium)
  • 1/2 cup medium salsa OR 1/2 cup diced tomatoes w/ green chilies
  • 1/2 cup white corn (from frozen, zapped for 2 minutes in the microwave - next time I want to try it with Trader Joe's Fire-Roasted Corn, but I didn't have any on hand last night)
  • 1-2 dashes cayenne pepper (alter to your own spice tolerance)
  • 1/2 tsp. cilantro
  • 3/4 cup reduced-fat Mexican cheese blend, shredded
Before assembling your quesadilla, wipe down the inside of your quesadilla maker with a damp cloth.  Spray both heating plates with cooking spray (I prefer using my Misto® olive oil sprayer).  Close the lid and plug-in the appliance to begin heating up.

Combine black beans, salsa/tomatoes, corn, cayenne pepper, and cilantro in a small bowl.


Lay 1 tortilla on a flat surface and spread filling over it (you will likely have some leftover filling, but don't over-fill or it will leak out during the grilling process).  Sprinkle shredded Mexican blend cheese over top of the filling.  Once the indicator light on the quesadilla maker shows that it is preheated, open the lid and transfer the tortilla with toppings onto the bottom heating plate.  


Top with 2nd tortilla, close lid, and cook for approximately 5 minutes.  When done, transfer the quesadilla to a plate and serve with sour cream, remaining salsa, and avocado/guacamole.


So, I went a little overboard with the salsa, but it was still tasty despite being a bit messy!

And there you have it!  A super simple, yet super tasty weeknight dinner that you can throw together in just a few minutes!  Ole! :)